1 Welcome
This tutorial is a collection of helpful Bash commands as well as some different loops that you can use for your own scripts. These tricks are things I have picked up along the way, and admittedly, things I often forget if I am not using them. If you are overwhelmed by this, or forget certain things, do not stress! Google is your best friend when it comes to coding, and you can always find help that way.
This tutorial uses two text files (XCZO_MapFile_copy.txt, codon_table_copy.txt) that you need to follow along. You can download these files here. However, you can use these commands with any and all files at your disposal - just be sure not to delete any of your files without triple checking, or making a copy!
1.1 What is Bash?
Simply, bash is a coding language that we can use to interact with our operating system, particularly a Unix-based operating system (OS). Unix and Linux operating systems are similar, so you can use bash to interact with these types of OS.
We use bash in the shell or command-line interpreter to tell the computer what we need it to do. On a Mac, we usually use the Terminal ap as our shell, whereas on Windows you can use the command prompt app as your shell.
For more information on Bash, check out its Wiki page here and look into this helpful bash/linux tutorial here.
2 A Crash Course in Bash
Let’s start with some simple basics and work our way up! Just to reiterate, these are JUST the basics. Please use this tutorial as a jumping off point for learning more about bash.
2.1 The Basics
pwd will print the directory we are currently in.
ls prints everything that is in our current directory. Find
more options for ls here.

pwd output
ls -l # list items in your current directory in a long list format
ls -ltr # list items in your current directory in long list format, reverse sort by time
ls -l output

ls -ltr output
Let’s make a directory called test_dir and get into that
directory. From there, we can create a text file called
test.txt and read this text file in the terminal.
mkdir test_dir # mkdir creates a directory
cd test_dir # cd stands for change directory

touch test.txt # touch is a command used for creating a file (not editing)
nano test.txt # nano is a command used to create OR edit a file, in this case we are editing test.txt
cat test.txt # cat is how to read a file
rm test.txt # how to delete a file(s) from your directory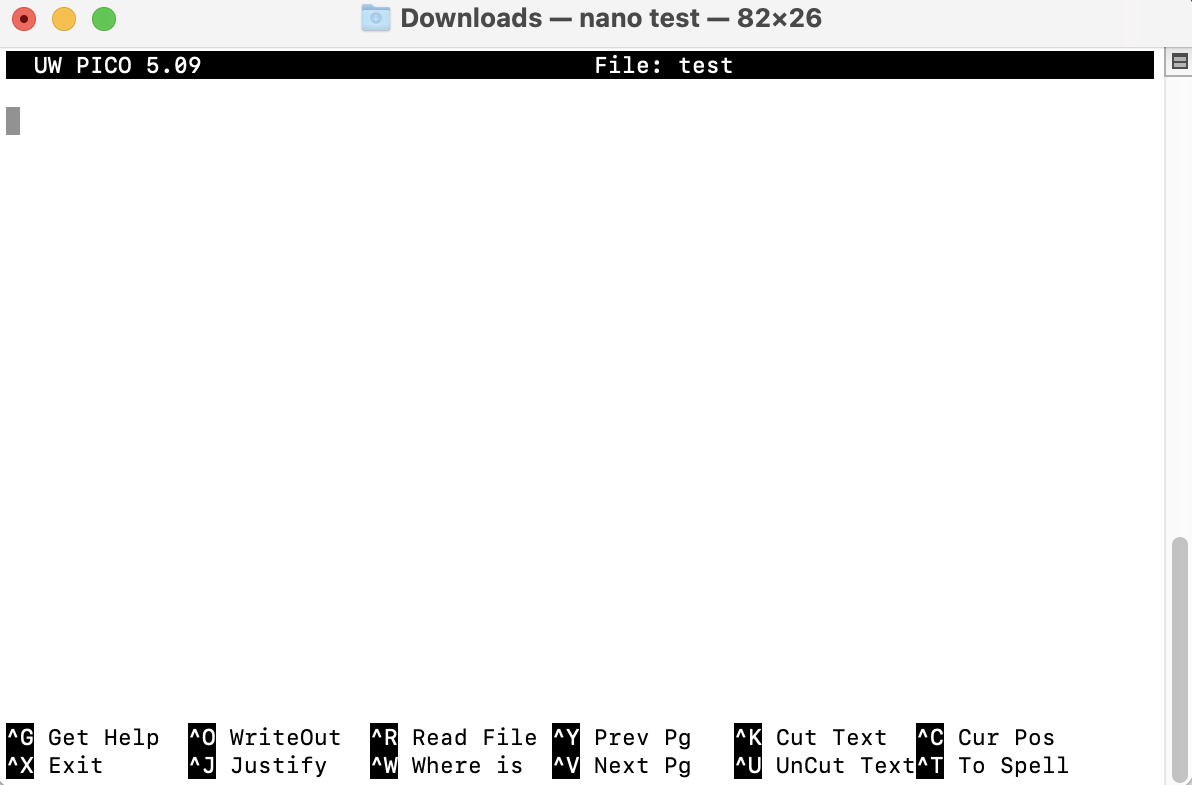
nano File edit screen for file called “test.txt”
To go back to your previous directory in your path (aka folder/you/are/in), do the following
Now let’s try some other commands we can use to seeing what is in a
file. head can show us the first 10 lines of a file, and
tail can show us the last 10 lines of a file.
head XCZO_MapFile_copy.txt # read first 10 lines of file
head n -15 XCZO_MapFile_copy.txt # read first 15 lines of file
tail XCZO_MapFile_copy.txt # read last 10 lines of file; uses -n in same way that head does
We can also use the more function to read files page by
page, using the spacebar to go to each page. Or, we can use the
less function to read the files line by line, using the
up/down arrows to navigate. These functions are very similar, however,
less is a bit faster because it does not load the entire file as you
read it.
more XCZO_MapFile_copy.txt # read file by page. Use "space" to go to next page.
# to quit, just type "q" and enter

less XCZO_MapFile_copy.txt # read file by line. Use arrows to navigate up or down the page. Has more options than more
# to quit, just type "q" and enter
We can also move the file around or rename the file with the
mv command, and make a copy of this file using the
cp command.
mkdir newdir # we will move our file into this directory
mv XCZO_MapFile_copy.txt newdir # move file into newdir

cd newdir
ls -ltr # what is in our directory?

mv XCZO_MapFile_copy.txt XCZO_Map.txt # rename file XCZO_MapFile_copy.txt to XCZO_Map.txt with mv
ls -ltr # sanity check - always good practice to see if your previous step worked!
cd ..

cp newdir/XCZO_Map.txt . # copy file in newdir to current working directory, represented by "."
cp newdir/* . # copy ALL files in newdir to current directory; "*" represents every file in newdir

# sanity check - did our copy just work?
cd newdir
ls -ltr
cd ..
2.2 Loops
These commands are great, but what if you need to do the same action on hundreds of files!? For example, what if you are reading a file of amplicon sequences and want to cound the number of sequences in each file, and save that information? That is when we can use the magic of loops in our scripts! Loops are not specific to bash, but you will find that a lot of languages (like R & Python) model their loop structures after the loops in bash.
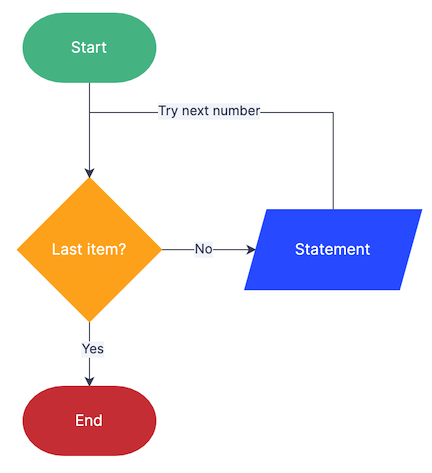
All the helpful flowcharts included below for each loop type come from ZenFlowchart.
2.2.1 While Read Loops
If we want to read every line in the file, we can create a
while loop to run through each line of the file, and use
the echo command to print out the contents of each
line.
The logic of the while loop is the following: while read x (line, string, etc), do x.

2.2.2 For Loops
If we want to be just a tad fancy, we can use a for loop
and the echo command to print everything in our directory.
We can loop through every file in our current directory by using the
* as a wildcard. This * is an example of what
we call a regular expression (aka regex) - basically,
the * can be used to as a wildcard character to represent
everything, OR it can be used as the asterisk itself.
Another example of a regex is the ., which can indicate
both our current working directory, characters we are editing, or as a
period itself.
To review, the logic of the for loop is the following: for x (a file, a line, anything you want) in this, do the following. This will loop repeteadly until all of the actions in the for statement are done.
for FILE in *; # for every FILE in our directory; "*" is a wildcard used to represent every thing
do
  echo $FILE # prints $FILE variable; use $ to call a variable later in loop or code
done

# Here, FILE is a variable you are creating and assigning to every file in your current directory
## You can refer to this variable later using the $
2.2.3 If-Else Loops
If we want to get a little fancier, we can use an
if else loop to create directories. Personally, I really
like using this trick when I want to make a directory, but I don’t know
if it already exists. The ! is the same as “not” - so for
the code below, I am checking if the directory (specificed with -d
argument) does NOT exist.
In summary, the if loop logic here is: if this directory does NOT exist, then make directory. Otherwise, the directory exists, and nothing is done by the loop.

2.3 Word Count & Grep
In scenarios when we have really long files, or are looking for
specific information within or about the file, there are several
commands we can use. grep is an extremely powerful way to
find certain patterns in your files/directories. There is a
find command in bash, but we will not go over that
here.
We can also use tools like wc to figure out how many
words (or lines or other pieces of information) are in our file of
interest.
wc codon_table_copy.txt # wc is the "word count" command
## for wc - first column shows line count, second column shows word count, third column shows character count

wc -l codon_table_copy.txt # count number of lines in file

grep Stop codon_table_copy.txt # find the Stop codons in the file
grep Stop codon_table_copy.txt | wc -l # find Stop codons, then count number of them by counting the lines

## | is a pipe that is used to string multiple commands together
wc and grep outputs.
We can also sort these files and pull out pieces of
unique (uniq) information from said files, like unique gene
IDs or protein names, etc. We can also be very specific as to where we
search/sort by using the cut command to specify which
sections/pieces we are cutting from.
grep Stop codon_table_copy.txt | sort # sorts the order in which these lines with the word "Stop" are arranged in the output; automatically sorts alphabetically in descending order

grep Arginine codon_table_copy.txt | sort | cut -f 3 # cut by field; in this case 3rd field is kept and rest are removed
# fields are designated by whatever delimiter is used. For example, in a .csv file, the delimiter is ",", so each field is separated by a ","
## ^ searches for Arginine, sorts output of grep, and cuts third field (a column in this case) and returns output only from 3rd field

grep Arginine codon_table_copy.txt | sort | cut -f 3 | uniq # uniq returns only unique or individual instances of text in file(s) - great for checking out duplicates and the number of duplicates

cut -f3 codon_table_copy.txt | sort | uniq -c # cuts third field based on tab (\t); sorts 3rd field, then finds unique instances of each string and counts them

# cut can also cut fields based on any delimiter - the default delimiter is tab (\t)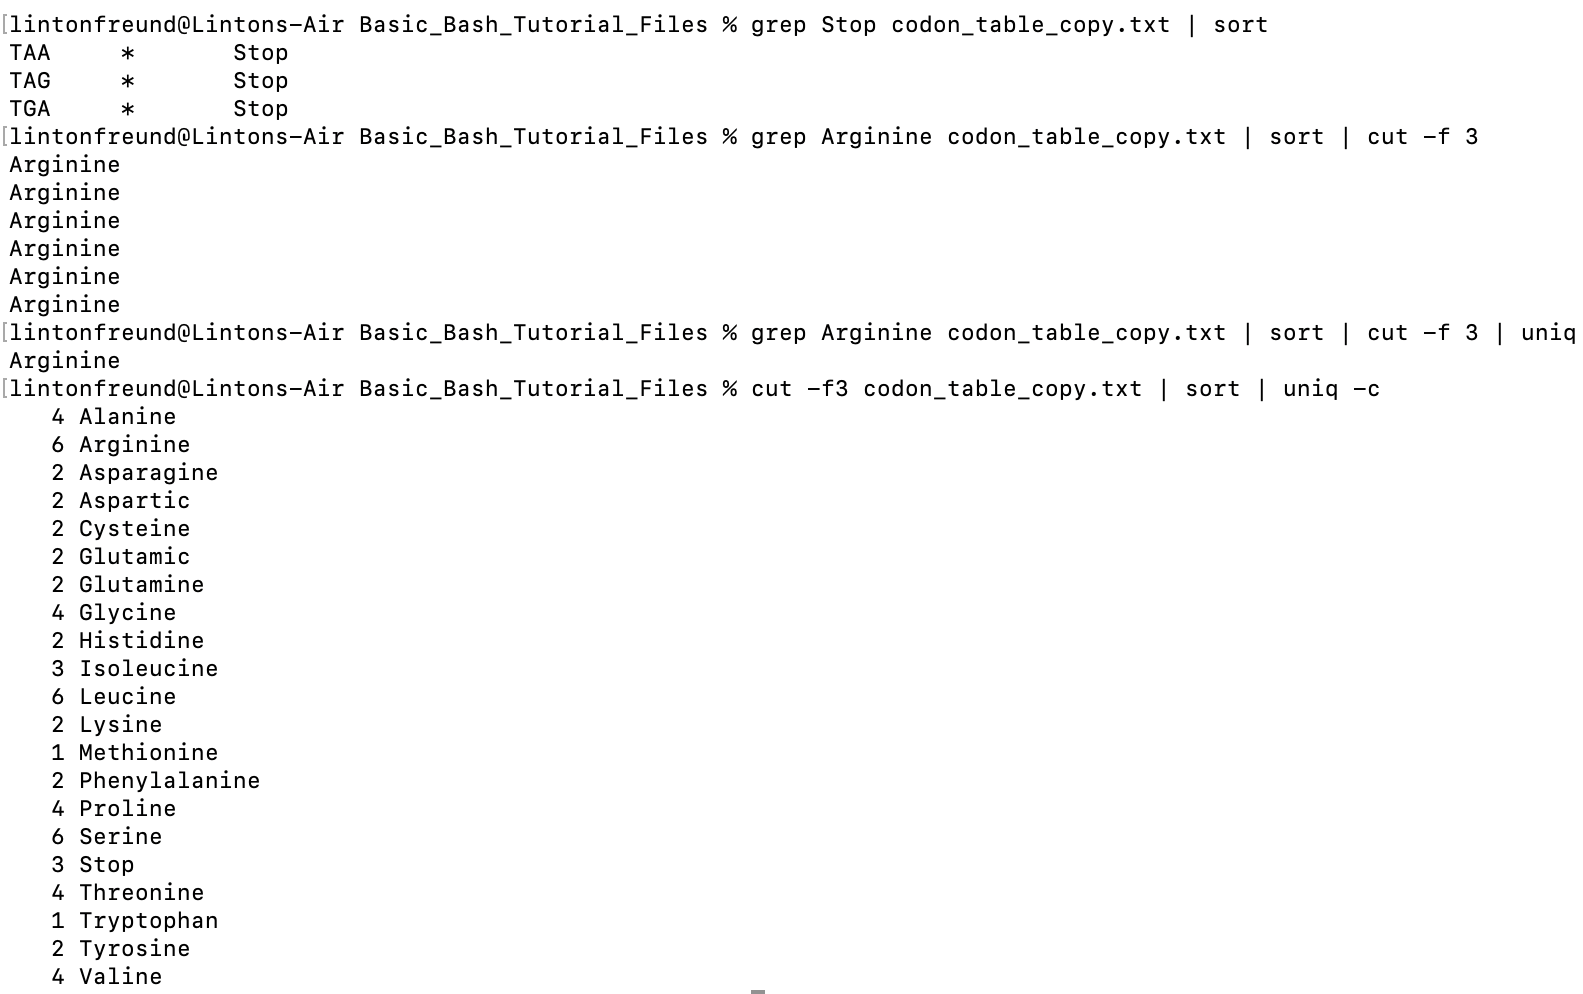
grep,sort,
cut, and uniq outputs.
2.4 Transform and Streamline Editor (aka sed)
Finally, we can edit files using the transform command
tr or the streamline editor command sed.
Transform or tr is used to make small edits across the
entire file. For example, if you wanted to delete all of the spaces from
a file, or if you wanted to switch all of your spaces to a tab, then you
can use transform.
cp codon_table_copy.txt codons.txt # make a copy of codon file so we can edit this file without changing original copy
head codons.txt # double check that this copy was successful by using head

tr a-z A-Z < codons.txt # transforms all lower case alphabetical characters to upper case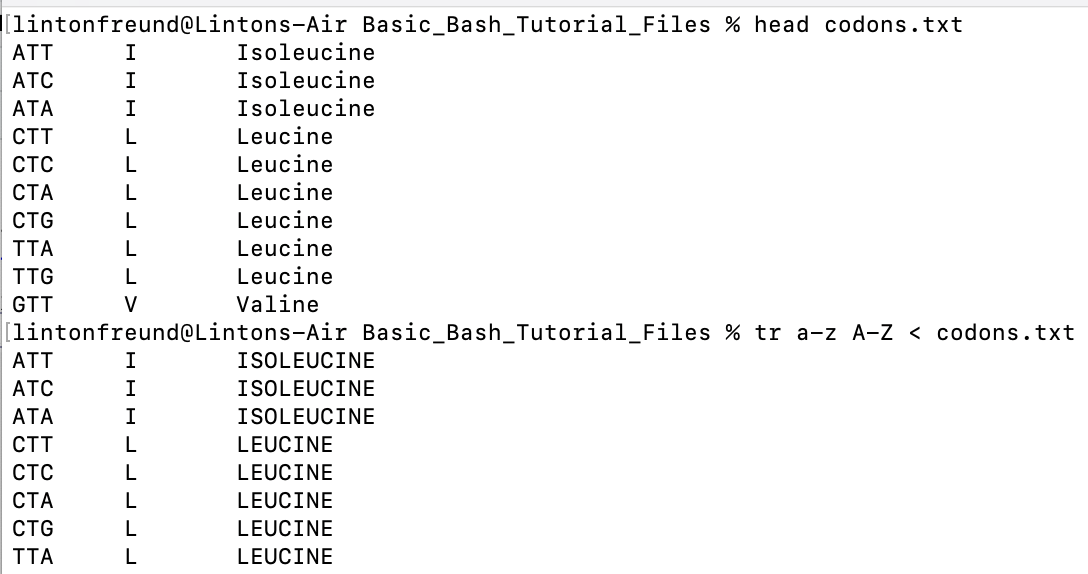
tr output, where we converted all
lower case letters to upper case.
sed is a lot more useful for editing and replacing, but
it does have somewhat of a weird syntax. The syntax is
s/old pattern/new pattern, where the old
pattern is the one you are editing, and the new pattern is what you are
replacing the old pattern with.
sed is extremely powerful but can get complicated rather
quickly, so for more on sed and using sed with
regular expressions, please read this Tutorials
Point link and the Geeks
for Geeks Link.
sed 's/\t/ /g' codons.txt # convert all \t to spaces with sed, so that now all fields or columns are separated by spaces and not tabs

## syntax is sed 's/original_pattern/replacement_pattern/g', where "g" stands for global editing,.
### This means you can make these changes all throughout the file (hence it's global) rather than just making one or two edits in the file 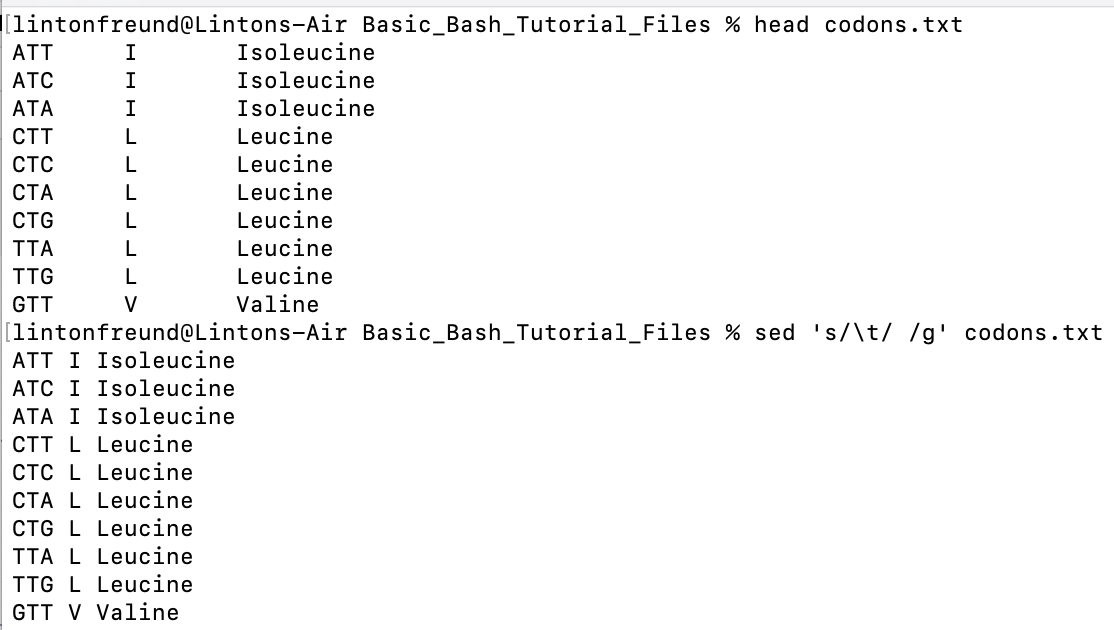
sed output, where we changed all tabs
to spaces.
3 The End
Thank you for following my basic Bash scripting tutorial! I hope it is rewarding and helpful.
If you’d like to get a hold of me to offer me feedback about this tutorial, do not hestitate to reach out. My contact information is in the About Me section.
4 Version Information
## R version 4.2.2 (2022-10-31)
## Platform: x86_64-apple-darwin17.0 (64-bit)
## Running under: macOS Ventura 13.5.2
##
## Matrix products: default
## LAPACK: /Library/Frameworks/R.framework/Versions/4.2/Resources/lib/libRlapack.dylib
##
## locale:
## [1] en_US.UTF-8/en_US.UTF-8/en_US.UTF-8/C/en_US.UTF-8/en_US.UTF-8
##
## attached base packages:
## [1] stats     graphics  grDevices utils     datasets  methods   base
##
## loaded via a namespace (and not attached):
##  [1] digest_0.6.31    R6_2.5.1         jsonlite_1.8.4   lifecycle_1.0.3  magrittr_2.0.3   evaluate_0.20    scales_1.2.1     stringi_1.7.12
##  [9] cachem_1.0.7     rlang_1.1.0      cli_3.6.1        rstudioapi_0.14  jquerylib_0.1.4  bslib_0.4.2      vctrs_0.6.1      rmarkdown_2.20
## [17] tools_4.2.2      stringr_1.5.0    glue_1.6.2       munsell_0.5.0    xfun_0.40        yaml_2.3.7       fastmap_1.1.1    compiler_4.2.2
## [25] colorspace_2.1-0 htmltools_0.5.4  knitr_1.42       sass_0.4.5
5 About Me
My name is Linton and my pronouns are they/them. I am currently a PhD Student at UC Riverside in the Genetics, Genomics, and Bioinformatics PhD program and a member of Dr. Emma Aronson’s lab.
If you have any questions regarding this workflow and the scripts I used, do not hesitate to contact me.